contact me

Send a little note!  I'd love to hear from you...


austin
usa

Blog

Filtering by Tag: desserts

Flowers for Sara's Birthday (Rose Cake)

apollina baker

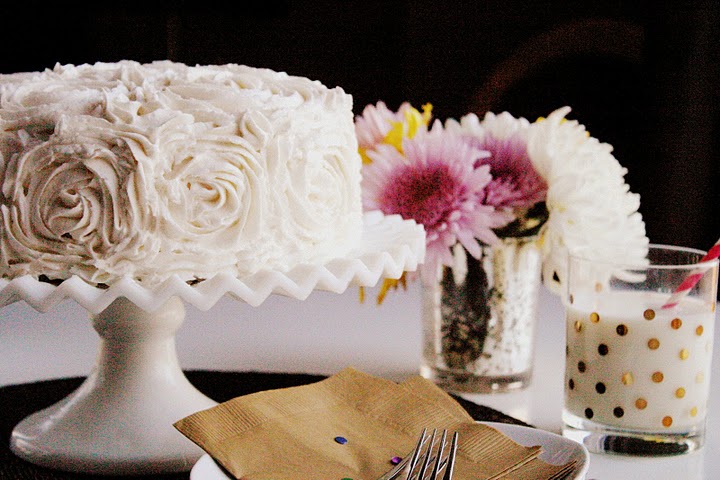
Friday was my friend Sara's birthday and I thought I'd get her some roses.  Since she looks so pretty in neon (as you can see in this pic from Refinery29) I thought a bright orange and pink bouquet would be appropriate.

Sara doesn't eat dairy so, I endeavored to make my first cake sans butter and milk.  Armed with this recipe for the chocolate cake and a frosting made with non-dairy shortening, almond milk and powdered sugar, I baked a 5 layer cake covered in orange and pink roses (I used the same piping bag so that some of the roses would be a pretty mix of the two colors.

Ever since learning how to make frosting roses from I am Baker, I've found it to be the easiest way to make a cake look pretty... the color possibilities are endless and your design job doesn't have to be perfect - the roses are very forgiving.  It's also just a lot of fun to do, swirling and swirling...  Just get a 1M frosting tip, read I am Baker's tutorial and go bananas with your future cakes.

There's Miss High Fashion 4 Less herself with her roses and Kata from The YouFinder.  Incidentally, that cake almost bit it on the cab ride over.  Happy 30th Sara!

Baking and Intimidation

apollina baker

I've never considered myself a baker though I love to bake things – cakes, cupcakes, cookies – things that are pretty and look like they were somewhat difficult to build.  I like doing it not because I love to eat them (which I do) or love to give them away (which is nice too) but because I never thought I could do it before.  Do you ever see these amazing baked goods and think, “they must have a lot of time on their hands to make that amazing thing” or “there must be some magic tools required or professional training involved”?  I was so enthralled with the idea of whipping up glamorous and delicious sweets but always assumed I could never do it myself.  Then one day, I had the crazy notion that I should try and make a cake.  Not a boxed cake but one where I measure the flour and the sugar and all that good stuff.  And then I decided to make frosting from scratch to go with my non-boxed-cake-mix cake.  I know it sounds silly but for some reason the whole ingredients to glorious confection process was totally intimidating to me and by simply making a homemade cake, baking became demystified.  I also learned that it isn’t really that hard, especially the icing (just whipping cream, sugar, vanilla) and that it tastes so much better.  So, after I made this simple vanilla cake with whipped vanilla frosting and layered with raspberry jam, it was on to other cute confections that scared me so.

First homemade cake - I whipped the cream by hand because I didn't even have a hand mixer at this point - it took WAY too long to get "soft peaks to form"

Since then, I've had fun trying to make other treats, not all of them successful (i.e. the St. Patty’s Day cake-pop disaster), but all of them were experiences that gave me confidence just because I tried.  The successful ones give me the immediate satisfaction of seeing what I could create if wanted to.  It’s really fun to impress yourself!


note that my photography is slowly improving as well - so much to learn!

Baking is a lesson to me,  you can make beautiful things happen with only two ingredients: wanting to and trying to.  Instead of assuming you can’t or that you just don’t have the necessary skills, equipment, know-how, whatever – just try to do it (I'm not just talking baking here).  Do it for you.  Life is too short to hesitate because of intimidation.

I’m still learning and just having fun.  I've never done a pie so I want to try to make one soon!  Oh, and I have some more sweets in mind inspired by my favorite fashion!  I’ll be keeping you posted on the outcome – both good and maybe not so good:)


4th of July Ice Cream Sandwiches, complete with fireworks!

apollina baker

I wanted to make something a little different this 4th of July.  Not the usual strawberry, blueberry and whip cream desserts.  So, here it is: Red, White and Blue Ice Cream Sandwiches with Pop Rocks!  A friend of mine recently visited Israel and brought me back some chocolate.  I was so surprised when my mouth started popping after I bit into it!  Apparently, they put pop rocks in their chocolate bars in Israel and let me tell you, it is awesome:)  So, I got to thinking, what better way to celebrate the 4th of July than with patriotic ice cream sandwiches that burst in your mouth like fireworks?!

Once I decided to make these, I got a little nervous thinking I wouldn't be able to find Pop Rocks.  A simple Google search led me to my neighborhood Walgreens and I was relieved!  I picked them up yesterday after work and was hoping to find some special edition Edy's red, white and blue ice cream but no such luck.  I wanted to get these all done last night so I was taking some short cuts.  On to Whole Foods where I picked up 3 cartons of ice cream: Blackberry (for the blue), Strawberry (for the red), and Vanilla.  I wanted to do these on shortbread cookies but I didn't find any boxed mix at Whole Foods so, since I was going for a quick and dirty method, it was on to Williams-Sonoma (W-S).  As an aside, in my neighborhood there is a Walgreens, Whole Foods and W-S all on the same block so that's why I hit them up, in that order.  Apparently, W-S discontinued their shortbread mix so I opted for the sugar cookie mix instead.  This is the first time I bought a W-S mix and they are expensive, $13 for this mix!  Next time I'll go to the Giant and get those prepared dough rolls.

I took everything home, left the ice cream on the counter to thaw and prepared my pans/baking sheets with plastic wrap for my ice cream re-freeze.  I followed the method in this video to form the ice cream.  Once the ice cream had thawed enough (to the point where you can manually whip it vigorously with a spoon) I started the coloring process.  The blackberry ice cream had a purple color so I added blue gel food coloring until it had the blue shade I wanted.  Then I poured it into those plastic wrap lined pans, wrapped it up tight and stuck it in the freezer.  I did the same thing with the strawberry ice cream and red gel food coloring.  After all the ice cream was in the freezer, I made my sugar cookie dough because it had to sit in the fridge for at least 2 hours before baking.  I used my little rectangular cookie cutters and baked the cookies according to package instructions.  After they cooled, I melted my white chocolate bark (previously purchased from Harris Teeter) and dipped the long side of the cookie in it.  Then, I sprinkled them with pop rocks and let them sit over night.  This morning I got up super early, assembled the sandwiches and took some pics.  They definitely need to harden up in the freezer after assembly, they were melting fast!

They look super fun and taste delicious.  I tried a cookie last night with the pop rock coating and it was awesome, it's such a fun feeling to have these little fireworks go off in your mouth! 

For an even quicker version, just buy the regular ice cream sandwiches and coat the ice cream with pop rocks.  They're perfect because everyone loves ice cream sandwiches and everyone loves pop rocks:)

Happy 4th of July!

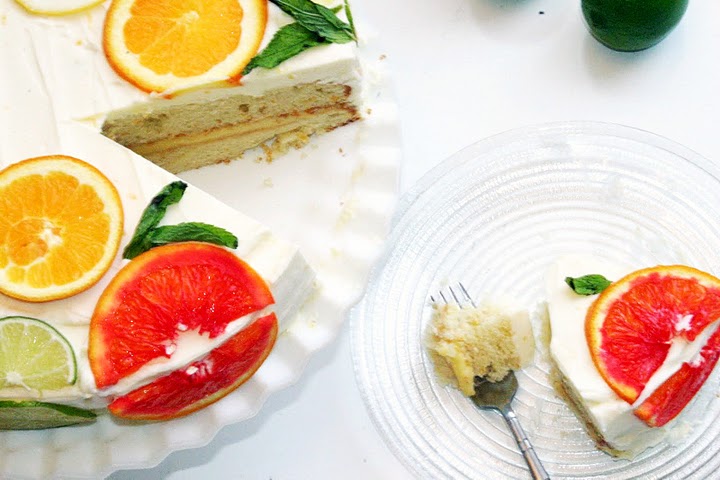
Citrus Cake with Lemon Curd Filling and Orange Lemon Icing (a.k.a. Stella Cake)

apollina baker

Those spring Stella McCartney prints we have all been seeing look delicious enough to eat.  So, now you can - in the form of cake...!

I pieced together a couple different recipes so that you get a ton of fresh orange and lemon flavors in every bite.  The two recipes I mainly used as guidance are this Real Simple one and this one from the San Jose Easy Meals Examiner.  I made this cake in two days, baking and preparing everything the first day and then assembling the cake the next.  I also used a 10 inch pan to get more surface area.

What a fashionable little cake, I call her Stella:)

Here are the directions:

Citrus Cake with Lemon Curd Filling and Lemon & Orange Icing

Ingredients

  • 1 cup (2 sticks) unsalted butter, at room temperature, plus more for the pans
  • 2 1/2 cups all-purpose flour, spooned and leveled, plus more for the pans
  • grated zest of 2 oranges
  • grated zest of two lemons
  • 1 1/2 teaspoons baking powder
  • 1/4 teaspoon baking soda
  • 1/2 teaspoon salt
  • 1 1/2 cups sugar
  • 2 teaspoons pure vanilla extract
  • 3 large eggs, room temperature
  • 1 cup whole milk
  • Blood oranges*, regular oranges, lemons, limes sliced to arrange on top of the cake
  • fresh mint, also to arrange on top of the cake

Directions

  1. Heat oven to 350°F. Butter two 8", 9" or 10" round cake pans, line the bottoms with parchment, butter again, and dust with flour, tapping out the excess. In a medium bowl, whisk together the flour, baking powder, baking soda, and salt; set aside.
  2. Using a mixer, beat the butter and sugar on medium-high until fluffy, 2 to 3 minutes.  Mix in the grated zest of the oranges and lemons.  Beat in the vanilla, then the eggs one at a time, scraping down the sides of the bowl as necessary.
  3. Reduce mixer speed to low. Add the flour mixture in 3 additions and the milk in 2 additions, beginning and ending with the flour mixture. Mix just until combined (don't over mix).
  4. Divide the batter equally between the prepared cake pans, leveling the top of each with a large spoon or rubber spatula.  Bake until a toothpick from the center of the cake comes out clean, 25 to 30 minutes for 8-inch pans, 22 to 25 minutes for 9-inch pans and 20 to 22 minutes for a 10 inch pan.  Cool the cakes in the pans for 15 minutes, then turn out onto racks to cool completely.  (After they cooled, I wrapped and froze my cakes until the next day).

Transfer one of the cooled cakes to a plate and spread with the lemon curd. Top with the remaining cake and refrigerate to set, 30 minutes. Then frost the rest of the cake!

Lemon Curd Filling (adapted from RealSimple)

Ingredients

  • 4 large eggs
  • 1 cup sugar
  • 1 tablespoon finely grated lemon zest
  • 1/2 cup fresh lemon juice
  • pinch salt
  • 1/2 cup (1 stick) unsalted butter, cut into pieces

Directions

  1. In a heatproof bowl, whisk together the eggs, sugar, lemon zest and juice, and salt. Add the butter. Set the bowl over (not in) a saucepan of simmering water and cook, whisking constantly, until the mixture has thickened (like the consistency of mayonnaise), 12 to 15 minutes. UPDATE: the lemon curd could take longer than 15 minutes to thicken up, just keep on whisking, I promise, it will happen.
  2. Pour the mixture through a fine-mesh sieve into a medium bowl.  Place a piece of parchment or wax paper directly on the surface of the lemon curd and refrigerate until completely cool, at least 2 hours and up to 2 days.

Fresh Orange Lemon Frosting

Ingredients

  • 2 cups (4 sticks) unsalted butter, at room temperature
  • 2 tablespoons finely grated lemon zest
  • 2 tablespoons fresh orange juice
  • 1 pound confectioners’ sugar (about 3 3/4 cups), sifted
  • pinch salt

Directions

  1. Beat the butter and lemon zest on high until light and fluffy, 3 to 5 minutes.  Add the orange juice.  Reduce mixer speed to low. Gradually add the sugar, then the salt, and beat until smooth, scraping down the sides of the bowl as necessary.  Ice the cake!  UPDATE:  I covered and refrigerated the icing overnight and then frosted the cake the next day after it thawed on the counter.

*I went to three different stores in order to find blood oranges... since the cakes were already made and I needed to decorate it... I just bought regular oranges and improvised with red food coloring. I'm sorry! I had to do it... I had no idea how unobtainable blood oranges could be!

UPDATE: You can also use grapefruits to sub for the blood oranges.  And, what I will do when I make this cake again, is instead of cutting the fruit in halves, I will drape the whole oranges and limes over the edge of the cake.  It's easier and will probably look even better.  Also, I had no problem with my fruit running but, just in case, after you slice the fruit, lay the slices on paper towels until you top the cake with them.